

In today’s digital landscape, optimizing network performance is crucial for businesses and individuals alike. Squid Proxy emerges as a powerful open-source solution that can significantly enhance your browsing experience, reduce bandwidth consumption, and bolster network security. This comprehensive guide will walk you through the benefits of Squid Proxy and provide a step-by-step installation process on Ubuntu.
Understanding Squid Proxy
Squid Proxy is a versatile caching proxy for the Web, supporting HTTP, HTTPS, FTP, and other protocols. Its primary functions include:
- Caching frequently-requested web pages to improve response times
- Reducing bandwidth usage by serving cached content
- Enhancing network security through access controls
- Functioning as a server accelerator
- Supporting various operating systems, including Windows
Key Benefits
- Improved browsing speeds
- Reduced network congestion
- Enhanced security features
- Extensive customization options
- Cross-platform compatibility
- Installing Squid Proxy on Ubuntu
Prerequisites:
A Ubuntu server (already set up)
Step 1: Update System Repositories
Begin by ensuring your system has access to the latest software versions:
sudo apt update
Step 2: Install Squid
Install the Squid package using the following command:
sudo apt install squid -y
Step 3: Configure Squid
Navigate to the Squid configuration directory:
cd /etc/squid
Create a backup of the original configuration file:
sudo cp squid.conf squid.conf.original
Replace the contents of squid.conf with a custom configuration tailored for performance and basic content filtering:
# Define the proxy port
http_port 3128
# Define access control settings
acl localnet src 192.168.1.0/24
acl SSL_ports port 443
acl Safe_ports port 80 21 443 70 210 1025-65535
# ACL for blocked websites
acl blocked_sites dstdomain "/etc/squid/blocked-websites.txt"
http_access deny blocked_sites
# Allow access to localnet and localhost, deny all others
http_access allow localnet
http_access allow localhost
http_access deny all
# Define cache settings for better performance
cache_mem 2048 MB
maximum_object_size 128 MB
cache_dir aufs /var/spool/squid 2048 16 256
# Refresh patterns
refresh_pattern -i \.(gif|jpg|jpeg|png|iso|deb)$ 1440 90% 43200
# Logging settings
access_log /var/log/squid/access.log
# Performance optimizations
strip_query_terms off
pipeline_prefetch 1
memory_pools on
quick_abort_min 0 KB
Step 4: Set Up Content Filtering
Create a file named blocked-websites.txt in the /etc/squid/ directory to list websites you wish to block:
procatinator.com
hooooooooo.com
papertoilet.com
Step 5: Apply Changes
Restart the Squid service to implement the new configuration:
sudo systemctl restart squid
Step 6: Configure Port Forwarding
For Squid Proxy to work effectively, especially when accessed from outside your local network, you need to set up port forwarding on your router. This step is crucial for allowing external traffic to reach your Squid Proxy server.
- Determine your Squid Proxy server’s local IP address. For this example, let’s assume it’s 192.168.1.100.
- Access your router’s administration interface. This is typically done by entering the router’s IP address (often 192.168.1.1 or 192.168.0.1) in a web browser.
- Access your router’s administration interface. This is typically done by entering the router’s IP address (often 192.168.1.1 or 192.168.0.1) in a web browser.
- Create a new port forwarding rule with the following details: External Port: 3128 (or your chosen Squid port) Internal Port: 3128 Protocol: TCP Internal IP Address: 192.168.1.100 (your Squid server’s local IP).
- Save the changes and restart your router if required.
This configuration, as illustrated in Figure 1, allows incoming connections on port 3128 to be forwarded to your Squid Proxy server, enabling external access to your proxy service.
Note: The exact steps for port forwarding may vary depending on your router model. Consult your router’s manual or support website for specific instructions.
Security Consideration: Opening ports to the internet can pose security risks. Ensure that your Squid Proxy is properly configured with strong access controls and consider implementing additional security measures like a firewall or VPN for external access.
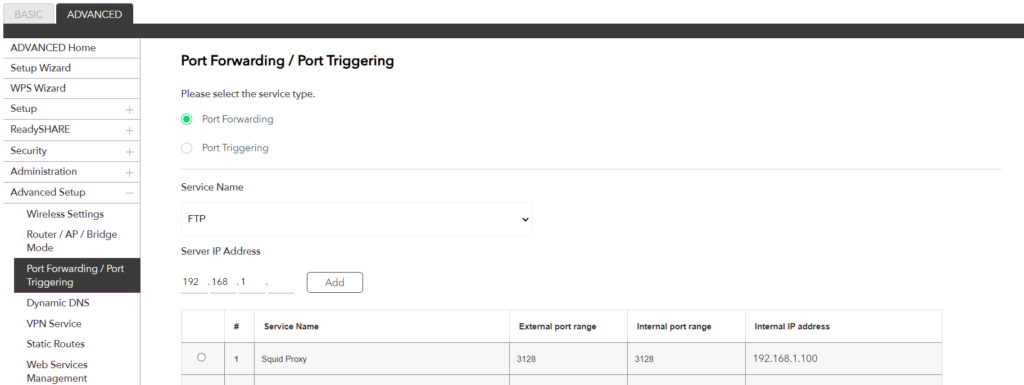
Figure 1. Port Forwarding Setup Example.
Configuring Client Browsers
To utilize your Squid Proxy, client browsers need to be configured. One popular method is using the FoxyProxy extension:
- Install FoxyProxy from the Chrome Web Store or Firefox Add-ons page.
- Open FoxyProxy options and add a new proxy configuration.
- Enter your Squid Proxy server’s IP address and port (default 3128) as shown in Figure 2.
- Enable the proxy in FoxyProxy to route traffic through Squid.
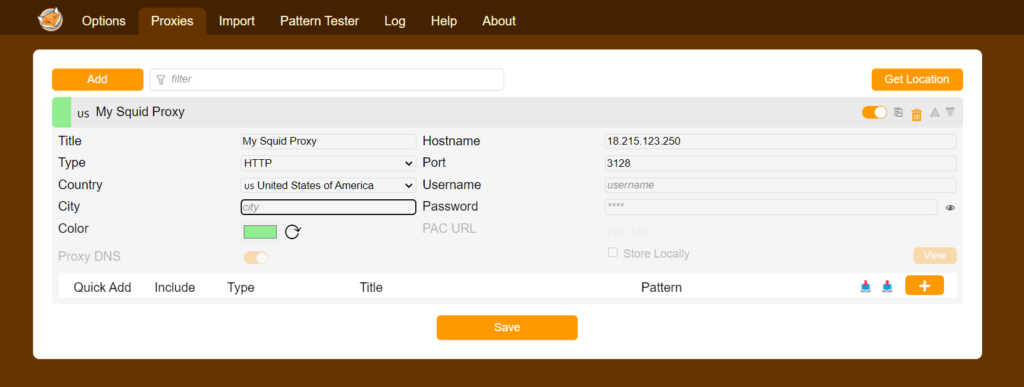
Figure 2. Example FoxyProxy Configuration.
Advanced Configuration and Customization
While the provided configuration focuses on performance enhancement and basic content filtering, Squid Proxy offers numerous additional configuration possibilities. Each network’s needs may vary, and customization is key to maximizing Squid Proxy’s potential. Some advanced features include:
- SSL bumping for HTTPS traffic inspection
- Authentication mechanisms for user access control
- Hierarchical caching for large-scale deployments
- Bandwidth throttling and quality of service (QoS) settings
- Advanced access control lists (ACLs) for granular traffic management
It’s recommended to explore the official Squid documentation and tailor the configuration to your specific requirements. The Squid wiki (https://wiki.squid-cache.org/ConfigExamples/) provides a wealth of configuration examples for various scenarios.
Conclusion
Implementing Squid Proxy can significantly enhance your network’s efficiency and security. By following this guide, you’ve taken the first steps towards optimizing your web traffic, reducing bandwidth consumption, and gaining greater control over your network. Remember to regularly update and fine-tune your Squid configuration to maintain optimal performance and security.
As your needs evolve, don’t hesitate to delve deeper into Squid’s advanced features. The flexibility and power of Squid Proxy make it an invaluable tool for network administrators seeking to maximize their infrastructure’s potential.
For more advanced configurations and detailed documentation, visit the official Squid website at https://www.squid-cache.org/.